ShopDreamUp AI ArtDreamUp
Deviation Actions


Suggested Deviants


Suggested Collections


You Might Like…


Description
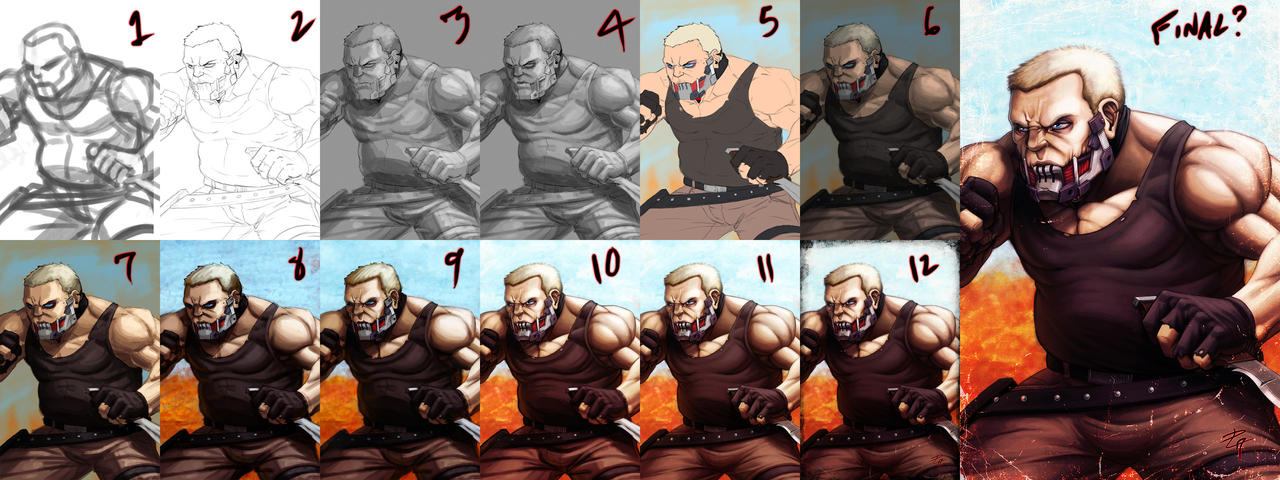
Drummond step-by-step. Tried a bunch of new stuff, here. The more I step out of my comfort zone, the better my pieces will be. The more painter-y
stuff probably where I feel the weakest, so that's where I want to focus for a while. While I didn't keep track of the time involved, I did think
maybe two people on the internet might want to see the process involved. So, uh... enjoy.
1. Rough thumbnail to feel out the piece. A lot of doodling poses, clearing the canvas, and repeating until I find something I like.
2. Blow it up to actual working size and sketch it out. Still a bit rough and loose, but good enough to use as a basis for the final.
3. Basic shading. Nothing fancy. Figure out what lighting I want to use and roughly map it out.
4. A little bit of refining after walking away from it for a bit. "Fresh eyes" is my common smoke break excuse. Turns out, it helps do more than
blacken my lungs.
5. Quick-o (and pretty much definitely temporary) background and some color.
6. Shading set to "multiply." Looks like butt at the moment. What can fix that? HMMMM....
7. Some tweaking and experimenting, of course. Adjustment layers, blend modes, gradient maps, etc. are applied and removed until I land somewhere
near what I want. Still figuring out which way I prefer to work at this point. Streamlining in progress.
8. Merge whatever layers I have (except the lines) and start painting on a new layer. Fix the glaring color issues I see as of now. More of that
to come, I'm sure.
9. Finally flatten the whole thing and go crazy with the painting. Also, try using the liquify tool for corrections. I see this a lot in time
lapse videos of artists I adore. This will come in handy once I get the hang of it.
10. PAINT, PAINT, PAINT. More minor color palette adjustments and liquifying. Create a new layer, paint some stuff, flatten, repeat. Comes in
handy when drastic changes are made that end up not being what I want after all. A sort of super ctrl+Z.
11. Pretty content with the face after the last bit. Time to focus on cleaning up the rest. Same process as before.
12. Color corrections, textures, et cetera. Finishing touches. While it's not quite done as far as I'm concerned, I have spent much longer on it
than I intended. Being overly nitpicky and spending significantly longer than I should on anything is a problem of mine, I'm told. It's hard!
Ultimately decided I didn't care for the border thing. Also, some more color adjustment after viewing it on something other than my monitor and thinking it looks like butt. HMMMMM.
Image size
3200x1200px 1.24 MB
© 2014 - 2024 combustocrat
Comments1
Join the community to add your comment. Already a deviant? Log In
EPIC AND EYEGASMIC, as usual O_O!!!